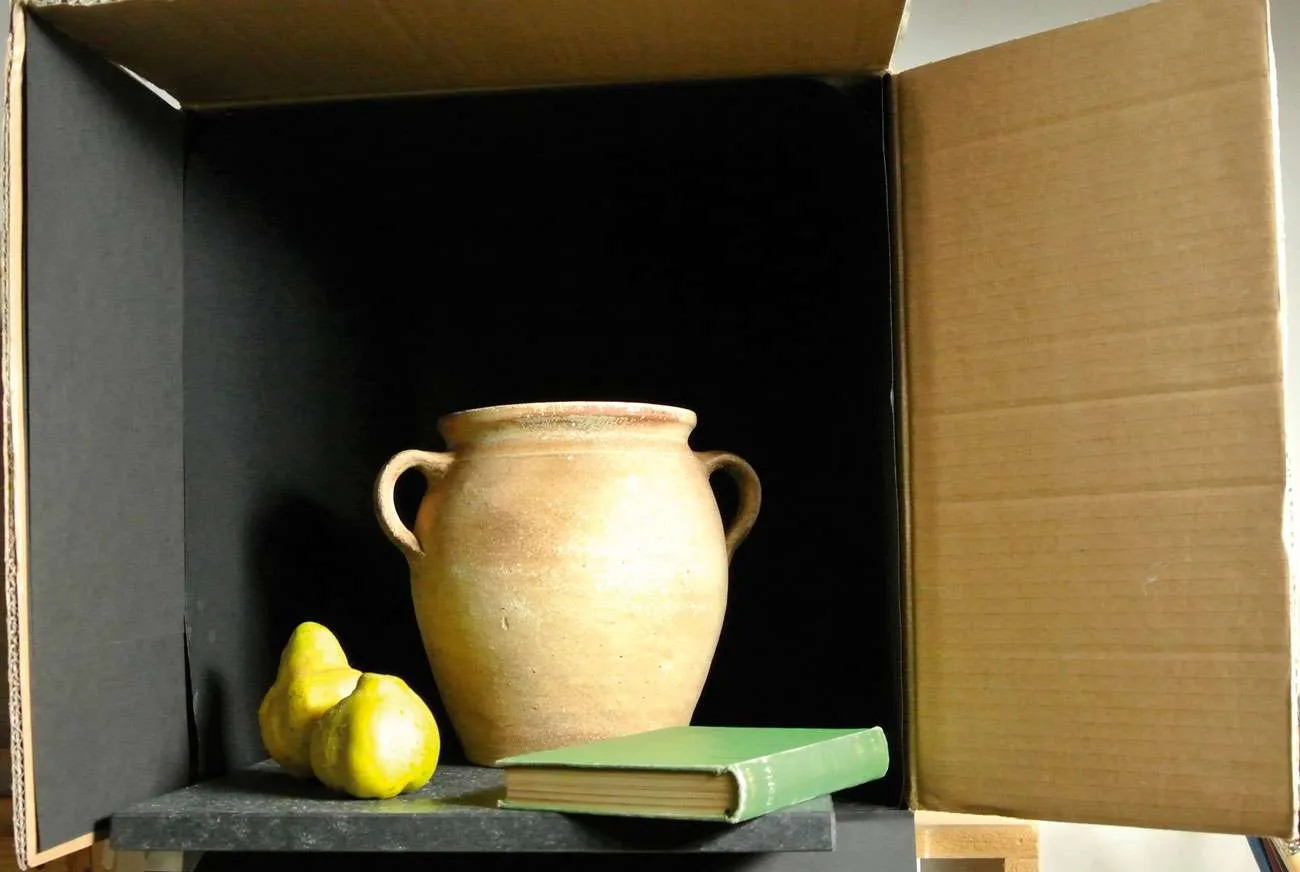
Earlier this month I gave to talk at the preview of an exhibition of work by six artists, and I was invited to be part of this mix. It is an exciting event, as is always the case when I step out of the studio to put my paintings on show and I talked about what goes on in the studio. This is where the shadow box comes in, as I have just made a new one.
It sounds like an optical device and it is. Having written that, I would happily wander into descriptions of another rather more enigmatic, historic device used in painting – the camera obscura, which is also worthy of starring in another article because its use is at the centre of much debate. But for now we will content ourselves with the shadow box as it is fresh in my mind so let’s take its construction and use step by step.
First, find a deep cardboard box. My new one is just 66cm deep with an opening of 40 x 40cm. The first one I made during the four years when I was studying in Florence. That shadow box was for a Tenebrist* piece and absolutely, enormously, unwieldy as it had to be a meter deep with an opening of at least 60cm x 60cm. Just imagine carrying that down the narrow Florentine streets!
Next step. Get quite a few sheets of good quality black drawing paper. I favour Ingres paper for it matt and velvety which will help create the illusion that things just sink away into a deep, dark infinity.
Now the tricky bit. The paper is used to completely line the inside of the box. This is done with the box turned on its side and, in the case of my Florentine box which had held a freezer, I had to clamber around inside to reach the box’s meter-deep base. My latest box has definitely been much easier needing only head and shoulders to be immersed into its depths.
The papering done, we now have our Shadow Box. Placed, still on its side, the flaps can be cut off or not. I prefer to keep my options open as, at this stage. Who knows how useful this extra depth may be.
The box is then positioned at the required height. Taking my painting position, the centre of the opening has to be pretty much at eye-level. It is then lit with a moderately strong light that will, in a perfect world, also supply enough light to paint by. This light will stay exactly where it is for the whole painting process. I mention this with some emphasis as quite frankly, wherever the light is placed it will always be in the way – unless of course you are actually getting on with the painting.
And now, the real fun part. The objects are put in place in the box and – with probably quite a bit of trying this and that, and then something else, and then maybe something completely different that needs supporting with fine nylon threads tied to a broom handle kept in place with a brick balance on top of the box, or a piece of paper cut in zig zags, to mute the light, which will flap around disconcertingly – we have our still life set up and . . . pure theatre commences!
*Tenebrist from the Italian tenebroso / dark, gloomy, mysterious, is a style of painting using pronounced chiaroscuro / light and dark, where there are dramatic contrasts with darkness being a powerful feature.
If you would like more detailed information about making yourself a shadow box, or see some of the results of its use, go to Marilyn’s web site. Menu NUTS AND BOLTS coming soon.
E-mail: [email protected]
www.marilynbailey.com